可以注意到,在最新版的XGBoost已经支持GPU运行了。以下我将介绍如何在python下配置xgb支持gpu。
##必要环境
- 安装git
- 如果你安装了桌面版的github 自带了gitshell
- Windows10勾选开发者模式bash也可使用
- 安装cmake
- 选择的是3.9.4版本的cmake-3.9.4-win64-x64.msi
- 一直下一步 并勾选添加到path。
- 安装cuda
- cuda9.0
- 选择的是win10版本
- local与network的区别参见官网 在此选择的local ##开始配置
- 下载最新版xgboostgit
- 可以用
git clone --recursive https://github.com/dmlc/xgboost - 也可以在https://github.com/dmlc/xgboost/下载master分支
- 可以用
- git进入xgboost根目录 笔者采用的是vs 2015 顺序执行以下语句cmake这句 若使用其他编译器 使用
1
2
3
mkdir build
cd build
cmake .. -G"Visual Studio 14 2015 Win64" -DUSE_CUDA=ON"cmake -help - 现在build文件夹中存在xgboost.sln
- 可以使用vs2015打开它 使用release生成解决方案(中途会出现锟斤拷,不必理会)
- 或者
cmake --build . --target xgboost --config Release
- 完成后进入.\xgboost\python-package
- 执行python setup.py install
测试你的GPU
- 进入.\xgboost\tests\benchmark
- 运行benchmark.py
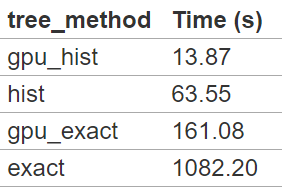
- 该步最好用spyder或者ide进行,方便修改参数。在40行 tree_method可设置为(gpu_hist,hist,gpu_exact,exact)
- 官网给了个基准(Training time time on 1,000,000 rows x 50 columns with 500 boosting iterations and 0.25/0.75 test/train split on i7-6700K CPU @ 4.00GHz and Pascal Titan X)
- 运行benchmark.py